Paneer Kurma | Easy side dish with rice/ puri/ chapati

I have shared many dosa, idli, sweets, baking recipes but curries are less on my blog as it’s regular dishes and I always feel all of you must already be knowing about it. But recently when I checked my blog statistics, I saw how people search for curry recipes and that’s when I realized that I must start sharing some of my quick yet tasty gravy recipes too.

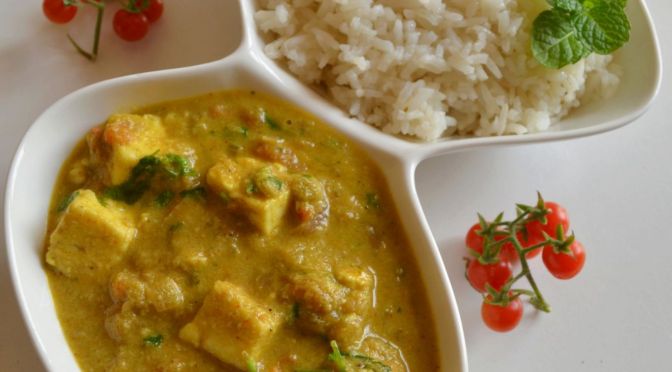
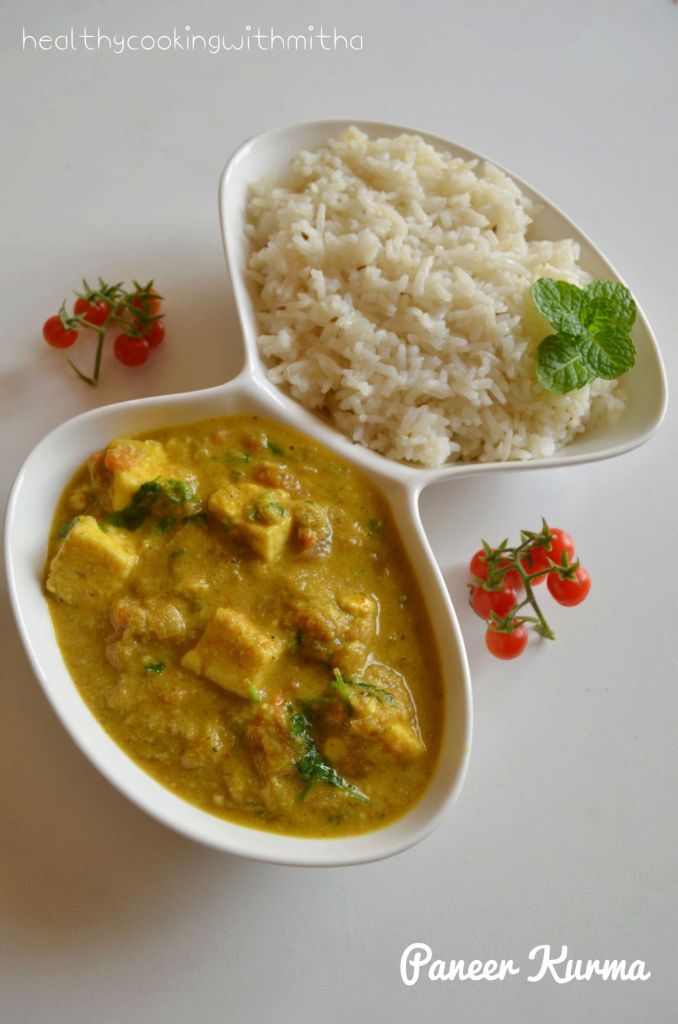
This Paneer Kurma is a very delicious accompaniment with rice and chapatis which reminds you of South Indian restaurant curries. You can also add vegetables to this gravy to make Vegetable Kurma. I do that when I get fresh beans and carrots.

Today I made the Kurma with just Paneer as it’s holiday for kids and I wanted to make something special for them. Needless to say, they were very happy to see their favorite Paneer for lunch.

Hope you all try this curry. I am sure you will love it too. Happy and healthy cooking ❤️

RECIPE:

Ingredients:

200 grams Paneer cubes

2 Tbsp Ghee

A sprig of curry leaves

1 medium sized Onion

1 medium sized Tomato

1/4 tsp Turmeric powder

1 tsp Red chilli powder

1 tsp Garam Masala powder

1/4 Cup Coriander leaves, for garnish

Salt to taste

For ground masala:

1/4 Cup Coconut

5 to 6 Cashews

2 tsp Fennel seeds

2 Cardamom pods

3 cloves

About 10 Mint leaves

1 inch Ginger piece

3 Green chillies

Step by step recipe:

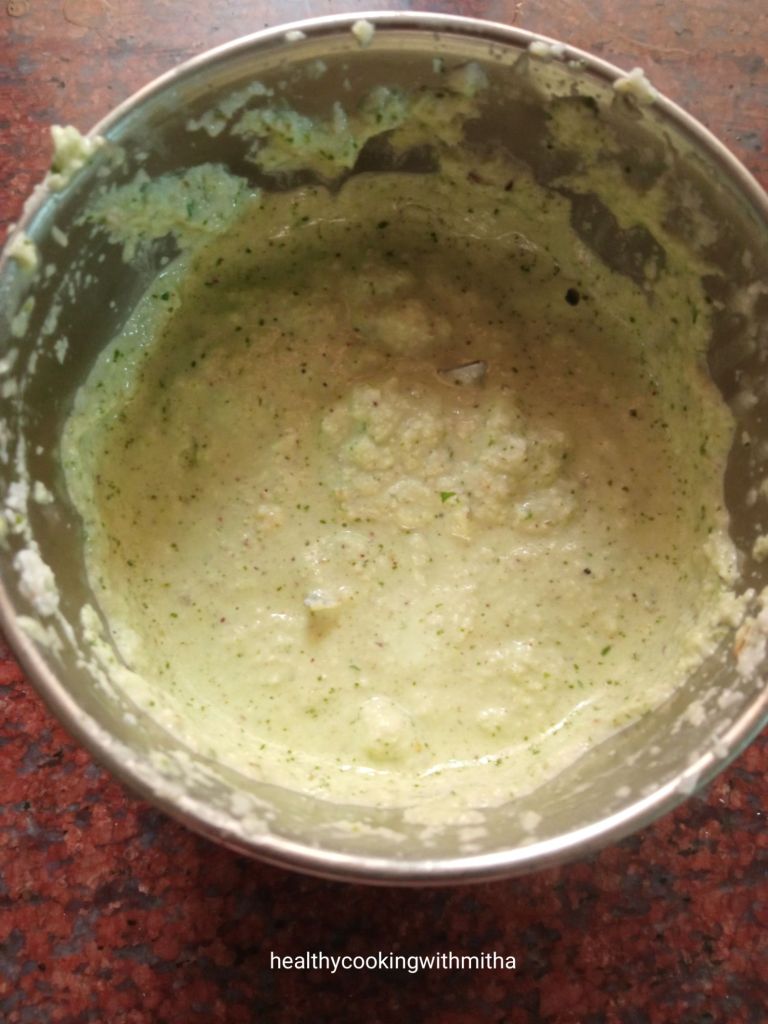
1. Take all the ingredients required to grind for masala in a mixer jar.

2. Add little water and grind to a smooth paste. Keep aside.

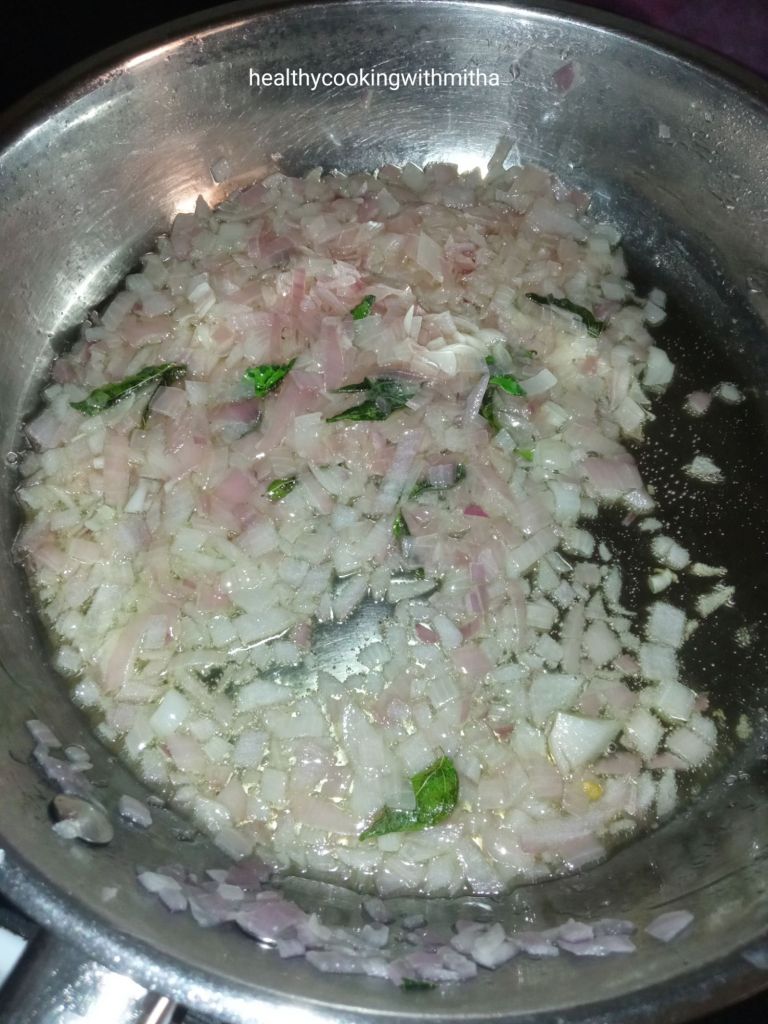
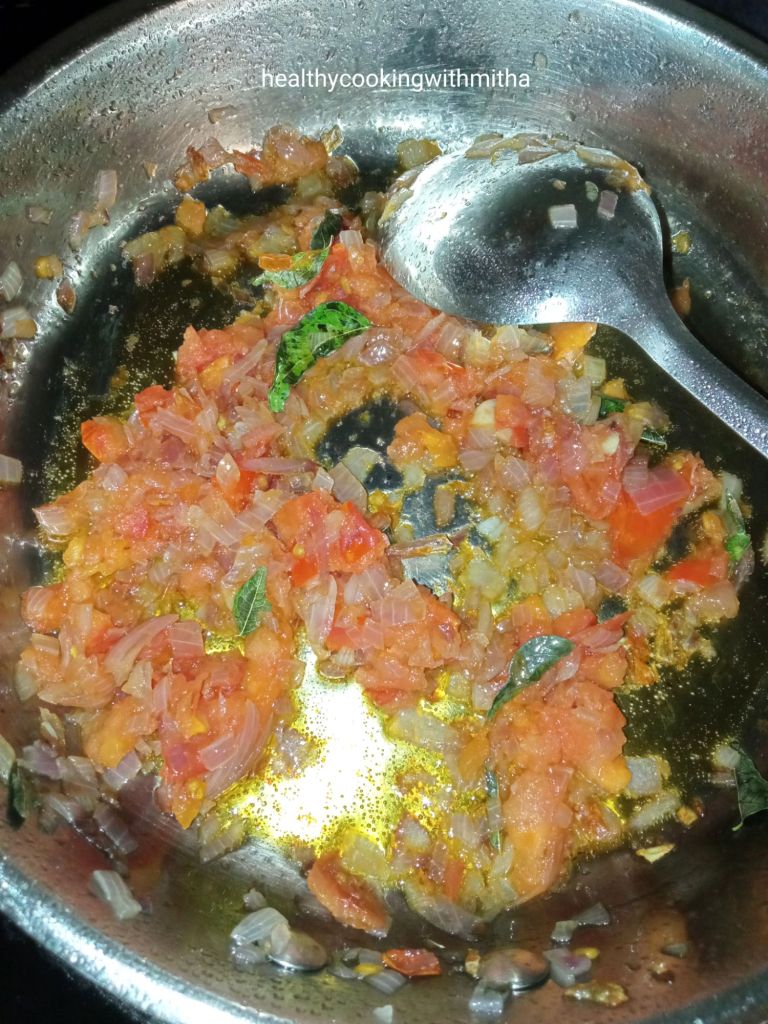
3. Heat ghee in a pan. Add curry leaves and finely chopped onion. Fry till onions turn translucent.

4. Now add chopped tomatoes and saute till tomatoes turn soft. Add little salt so that the tomatoes cook faster.

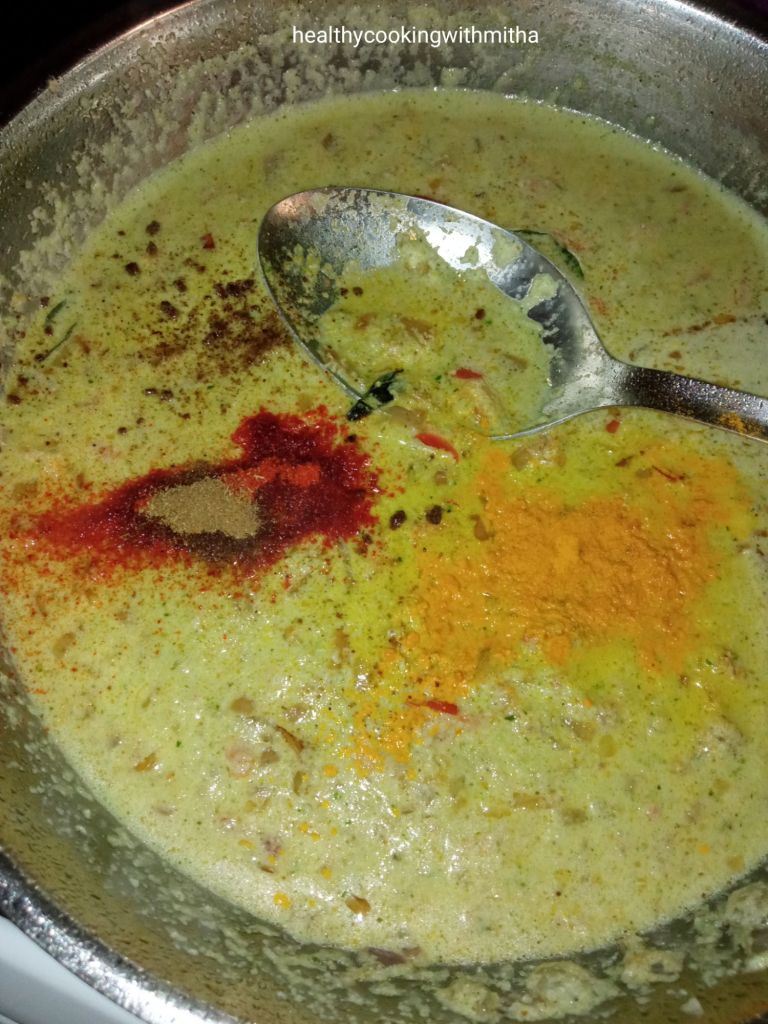
5. Add the ground masala with little water. Mix well and then add turmeric powder, red chilli powder and Garam masala powder. Keep sauteing on medium flame as the gravy can splatter due to cashews in the paste.

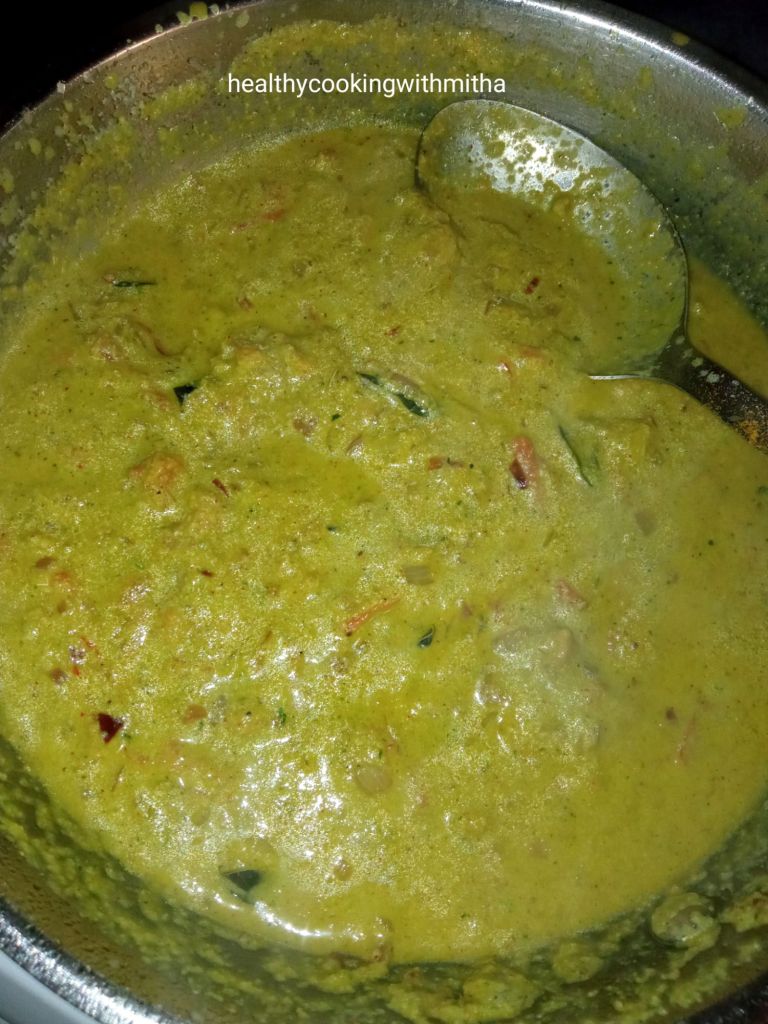
6. Saute for about 5 mins till the gravy thickens and cooks well. Also add salt.

7. Add paneer cubes, mix well, cover and cook on medium flame for about 10 more mins. Remove from flame and add chopped Coriander leaves.

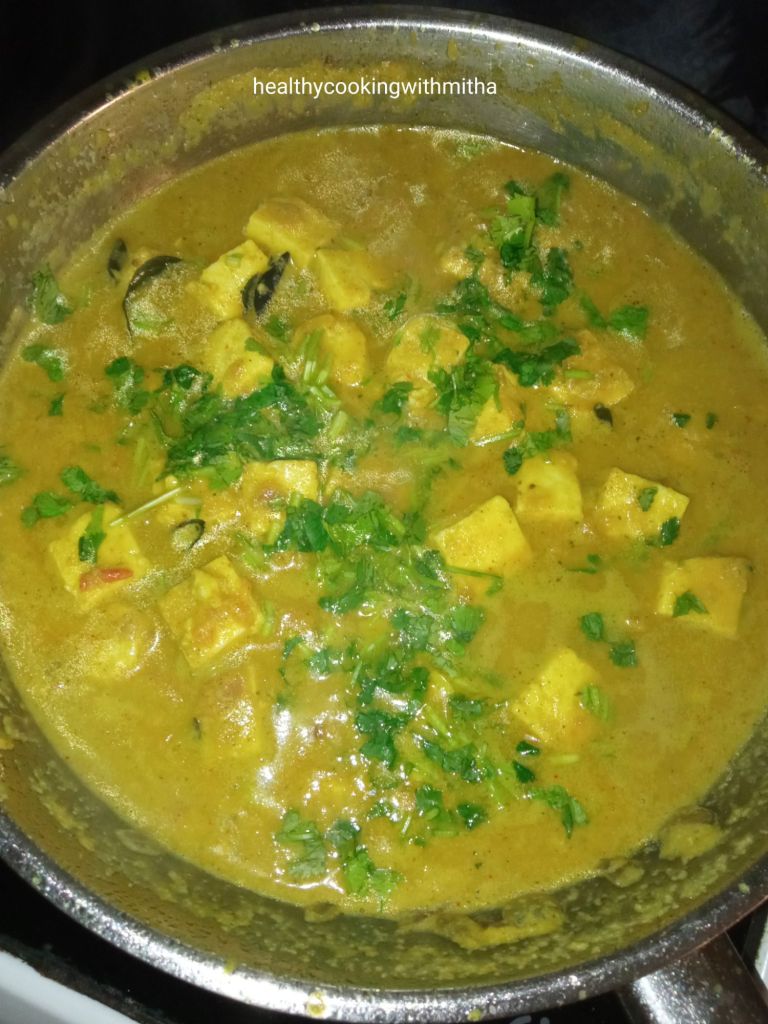
8. Done! Serve with rice or puri or chapatis. I usually serve this with jeera rice.

Notes:

* You can also add mixed vegetables to this gravy to make Vegetable Kurma.

* Other Paneer dishes that I make regularly:

Palak Paneer

Paneer Kathi Roll

Dhaba style Paneer Masala

Paneer Butter Masala

Paneer Sukka

Paneer Hara Masala

Vegetable Paneer Chilly

Aval Payasam | Phova godshe | easy sweet with poha

Click on the picture to save the recipe on Pinterest

Today is Shree Rama Navami which is one of the most important festivals for us. We Konkanis make many dishes today dedicated to Shree Rama which I have already shared in my Rama Navami recipe collection page. I also made Paanak and moong dal kosambari to celebrate this occasion.

Along with that, like always, I had to make a sweet too. Usually it would be jaggery Poha or godu phovu as we call it. But today I decided to make something different yet very tasty Aval Payasam. It’s easy and hardly take 15 mins to make but is delicious. Today as I made it on a special day, it was extra tasty due to Shree Rama’s divine grace. 🙏

I sat quickly to write the recipe as well so that it’s helpful for those of you who are looking for easy sweet recipes. Hope you all try and like it too. Wishing you all a very blessed Shree Rama Navami. Jai Shree Ram 🙏

RECIPE:

Ingredients: { Serves 3 to 4 people }

1 Cup = 240 ml

1/2 Cup thick Poha/ flattened rice/ Aval

2 Tbsp Ghee

Handful of Cashews and raisins

1 Cup thin Coconut milk (1/2 Cup thick coconut milk + 1/2 Cup water)

1 Cup thick Coconut milk ( I used canned)

1 Cup Jaggery powder

2 tsp Cardamom powder

Step by step recipe:

1. Heat ghee in a thick bottomed pan. Add cashews and raisins. Roast till it turns slightly brown in colour.

2. Now add  1/2 Cup thick Poha. Roast for couple of minutes till it turns crisp.

3. Add 1 Cup thin Coconut milk. I had used canned coconut milk. I took 1/2 Cup of thick Coconut milk and added 1/2 Cup of water to make 1 Cup thin Coconut milk. Allow it to boil for about 5 mins.

4. Add thick coconut milk and jaggery, 1 Cup each together. Allow it to boil for about 5 to 8 mins till the Poha turns soft. Adjust the consistency of the Payasam if needed.

5. When the Payasam turns thick, add cardamom powder. Mix well. Done! Enjoy hot Payasam.

Notes:

* Use thick Poha and not thin as thin Poha will not give the desired texture of the Payasam.

* I have used canned coconut milk. You can use fresh one by grinding fresh coconut and sieving to extract the milk.

* You can increase the coconut milk depending on the Poha, if it absorbs and becomes thick.

* Do check my other recipe collections:

Ram Navami recipes compilation

Ready in 15 min easy sweets collection

Click on the picture to save the recipe on Pinterest

Guacamole Wrap | Avocado dip/ spread

Click on the picture to save the recipe on Pinterest

My husband’s company bus takes us to three of the oldest (and everyone’s favorite) malls in Qatar every Friday, alternating between City center, Villagio and Lulu. Although we only go sometimes due to husband’s busy shift work, kids absolutely love going to Villagio and City center as they both have huge play places.

If you ask me, I love Villagio just to look around people enjoying the boat rides inside the mall, few others posing for pictures and kids running around happily looking at the boats. ❤️ Food and shopping options are better at City center mall but Villagio does have Asha’s restaurant by Asha Bhonsle ma’am for great Indian vegetarian food.

Recently when we went to Villagio, I had already made dinner at home. So we were looking for light snacks there. That’s when I saw this guacamole wrap at Tea Time while waiting in their long queue for Karak tea ( I love love Karak 😍).

After tasting the wrap, I felt I could make it even healthier at home with our regular chapati. Few attempts later, I can now say, the guacamole wrap that I make tastes really super delicious.

To my luck, both Kenyan and South African Avocados are getting very cheap here and so in our weekly grocery, Avocadoes are a regular now. Kids enjoy its milkshake and love the wrap as well. For me too, it’s a filling, healthy snack before I go for my evening walk.

So this is how I make the Guacamole wrap and hope you all loved reading my short story. 😍 Do try it too when you get Avocadoes. Happy and healthy cooking ❤️

RECIPE:

Ingredients: {Makes about 4 wraps}

For the Guacamole:

2 ripe, soft Avocadoes

Juice of half a large lemon or to taste

1 small sized Onion

1 small sized Tomato

2 to 3 Green chillies

2 Garlic, peeled and finely chopped

3 Tbsp finely chopped Coriander leaves

Salt to taste

For the Wrap:

One chapati/ roti for each wrap

Step by step recipe:

1. Chop the stem part of the Avocadoes. I used Kenyan Avocadoes which are dark brown or black in colour.

2. Now it’s easy to peel off the skin like this.

3. Add to a bowl.

4. Remove the seed (one each) and mash both the Avocadoes using a fork till they are smooth in texture.

5. Add lemon juice and salt. Mix well. At this point, add lemon juice little by little, while tasting. You can also add more later. It takes me half a large green lime for two avocadoes.

6. Now add all the other ingredients like onion, tomato, green chillies, garlic and coriander leaves.

7. Mix everything and do a taste test for salt and lime. Guacamole is done! You can use it as a dip or as a spread.

8. For wrap, take a regular chapati. I make it triangular in shape so that it’s easy to hold the guacamole inside. Spread the guacamole evenly over the chapati as shown.

9. Roll to make the wrap.

10. Done!

Click on the picture to save the recipe on Pinterest

Notes:

* In Guacamole, as per me, lemon juice and garlic are the most important ingredients. When I ate the wrap at Tea Time, Villagio, I felt the taste was slightly bland as the lemon juice was less for me and they had not added garlic. In my first attempt too, I skipped garlic and I felt it was not as flavourful.

* So I checked many authentic Guacamole recipes and found garlic in all of them. So I too added it and how wonderful does it taste with garlic and a little extra lemon juice. 😍 However if you are not a sour taste lover, you can add lemon to your taste.

* Green chillies can be added to your taste as well.

* Kenyan Avocadoes are so soft in texture and easy to peel as well as compared to Green Avocadoes. If using green ones, look for ripe ones and scoop the pulp using a spoon instead of peeling the skin like I showed above.

* For chapati, just knead whole wheat flour, salt and water to make a firm, soft dough. Keep it to rest for atleast 30 mins. Roll and make chapatis adding ghee while flipping in the pan.

* You can also try:

Paneer Tikka Wrap

Click on the picture to save the recipe on Pinterest

Hotel style green chutney| Mint Coriander chutney

Click on the picture to save the recipe on Pinterest

B is for breakfast but in our house it’s D for breakfast as the kids absolutely love D for Dosas. So everyday I have to keep any one kind of dosa batter ready for them. 😍

And along with dosa comes either sambar or chutney. I love making different varieties of chutneys and have shared many recipes on the blog too. This particular green chutney reminds me of hotel ones as it tastes so yum.

So here’s sharing this simple, easy recipe for you to try with your dosas and idlis. Happy and healthy cooking ❤️

RECIPE:

Ingredients: { Serves 2 to 3 people }

1 Cup = 240 ml

1 Cup Coconut gratings (fresh or desiccated)

1/4 Cup Gram dal (roasted or unroasted, both are fine)

1/2 Cup Coriander leaves

6 to 8 Mint leaves

3 Green chillies

2 tsp Cumin seeds

1 tsp Tamarind paste

Salt to taste

For seasoning:

1 Tbsp Coconut oil

1 tsp Mustard seeds

A sprig of Curry leaves

Step by step recipe:

1. Take in a mixer jar all the ingredients for the chutney.

2. Add about 1/4 Cup water and grind to a smooth paste, adding water little by little as necessary. Add to a serving bowl.

3. Heat coconut oil in a small pan. Add mustard seeds and allow it to splutter. Add curry leaves and fry for few seconds. Pour over the chutney.

Serve with dosas or idlis. I have served it with soft Methi Urad dosas.

Notes:

* As mentioned above, you can use both roasted or unroasted gram dal for the chutney. Adding it adds a wonderful flavour and texture to the chutney.

* You can also check this delicious coriander leaves chutney recipe:

Roasted gram dal and Coriander leaves chutney

* If you love mint flavour in chutneys, you can check this:

Pudina Lehsun Chutney

* You can check all my chutney recipes here:

Chutney Recipes collection

Other recipe collections:

No Rice dosa recipes collection

Variety Idli compilation

Click on the picture to save the recipe on Pinterest

Carrot Jaggery Halwa | Gajar ka halwa with jaggery

Click on the picture to save the recipe on Pinterest

My first blog this year and so glad I am starting on a sweet note ❤️ I have a special relation with sweets, my name Mitha meaning sweet in Hindi, my best friends call me Ladoo and most of all, I can’t resist any kind of sweets. 😍 Be it our authentic Konkani godshe, payasams from Kerala, kesari from Tamil Nadu, Mysore pak, gulab jamun and all milk based sweets too.. I can just go on and on.. 😀 Being in Qatar since more than 12 years now, Arabic sweets have a special place in my heart ( and tummy 😅) too ❤️

Since I am such an ardent fan of sweets, I have learned to make many at home over the years. Have shared most of the recipes here on the blog. One sweet dish that I make regularly specially during winters is this Carrot halwa or lovingly called as Gajar ka halwa 😍 I rarely eat this dessert from outside and I truly love the way I make my halwa ❤️

So here’s sharing this easy yet finger licking delicious recipe with all of you so that you can try at home too. Dedicating this to all sweet lovers like me ❤️ Happy and healthy cooking ❤️

RECIPE:

Ingredients: { Makes about 4 half cup servings }

1 Cup = 240 ml

2 Cups Grated Carrot

1/2 Cup Milk

3/4 Cup Jaggery powder

3 Tbsp Ghee

About 5 to 7 Cashews

About 8 to 10 raisins

1/4 tsp Cardamom powder

Step by step recipe:

1. Take carrots, cut off the ends, wash and peel them. Grate using a grater. I took two large carrots and it gave me 2 Cups of carrot gratings. Keep it aside.

2. Heat a thick bottomed pan. Add 1 Tbsp Ghee and add chopped cashews and raisins. Fry on medium flame till cashews turn light brown and raisins plump up. Remove it onto a plate.

3. Now heat the rest of the ghee (adding around 2 Tbsp more). Add the grated Carrots and fry continually for 5 to 7 minutes till the rawness of carrots goes away.

4. Add milk and cook the carrots in milk for about 10 mins till the milk gets absorbed by the carrots. Keep the flame on medium to low always, mixing every couple of minutes.

5. When the milk gets absorbed well by the carrots, it looks like this.

6. Now add jaggery powder to this.

7. Mix well and let the carrots absorb the jaggery. Cook on medium flame till the mixture turns thick.

8. After about 10 mins, the mixture looks like this. It’s perfect halwa and you can remove the pan from the flame now.

9. Add the halwa to the fried cashews and raisins. Also add cardamom powder. Mix well. Halwa is ready.

10. Serve warm halwa. Tastes delicious in this cold weather ❤️

Click on the picture to save the recipe on Pinterest

Notes:

* I have used orange carrots as they are easily available here but you can also use the red carrots which are regularly used to make carrot halwa.

* Three most important points while making this halwa is:

1. Fry the carrots well in ghee till the rawness of the carrots goes away. This is a very important step else the carrots will have a raw flavour.

2. Secondly make sure the milk is absorbed fully by the carrots before adding jaggery. Else the jaggery can curdle the milk (depending on the brand). Also the flame should be from medium to low while the carrots are cooked in milk, else milk can stick to the bottom of the pan..

3. Thirdly, when jaggery is added, the mixture will become liquidy but keep cooking on medium flame till the mixture thickens and the jaggery is well absorbed by the carrots.

* Don’t skip cardamom powder. Gives a wonderful flavour to the carrot halwa.

* I also make refined sugar free Dates Carrot Halwa. You can try that too if you don’t want to use jaggery as well.

* Another unique sweet that I make with Carrots are Dates Carrot Puranpoli or Ubbatti. Tastes really delicious.

* I usually make sweets which takes 15 mins or less time to make. Have compiled all the recipes together in a page. You can check that :

Easy to make, 15 min sweets collection

Moringa leaves chutney | Easy chutney with drumstick leaves | Mashinga palle chutney

Click on the picture to save the recipe on Pinterest

Whenever I hear or read jokes about how healthy food can never taste good, I feel a little bad but get even more motivated to change the notion through my blog. “Food is medicine to the body” – that’s what I believe in and try to include carbs, protein, fat, vitamins and minerals in every meal I make.

Specially after I became a mother, I realized I have to make the meals in such a way that not only are they healthy but kid friendly as well. Gratefully, they eat almost everything I cook and I think it’s because I started giving them regular food as soon as they turned 6 months. No baby food or purees. Just normal idli, dosa, rice, chapati with chutneys and curries.

In chutneys, I try to include greens depending on the season and during winters, I definitely make Sambarpalli or Ajwain leaves chutney and this Moringa leaves chutney as it’s very healthy and great for immunity. They don’t realize it has superfoods in it and enjoy it with their dosas and idlis.

The flavour is just like any restaurant style green chutney and there is no bitterness of moringa at all. A must try chutney for sure. Hope you all try and love it too. Happy and healthy cooking 💚

RECIPE:

Ingredients: { Serves three to four people}

1 Cup = 240 ml

1 Cup Moringa leaves/ Drumstick leaves (after stems are removed)

3/4 Cup freshly grated Coconut

3 Green chillies

1 tsp Cumin seeds/ Jeera

1 tsp Coconut oil

1 tsp Tamarind paste

Salt to taste

Step by step recipe:

1. Pluck the leaves from the stem as shown. Place in a sieve or a colander and wash well. Keep aside.

2. Heat oil in a pan. Add cumin seeds and fry for few seconds. Now add chopped green chillies and the washed moringa leaves.

3. Keep frying for a minute till the leaves are well roasted in the oil. Remove from flame. Allow it to cool.

4. Now take coconut gratings in a mixer, add the fried leaves mix, tamarind paste, salt and little water.

5. Add water while grinding as needed and grind to a smooth paste. Pour into a bowl. Chutney is ready to serve.

I served it with Panpolo or Neeru dose and it was a heaven made match 🤍💚

Click on the picture to save the recipe on Pinterest

Notes:

* I do not season the chutney with mustard seeds/ curry leaf as I feel it’s not needed since we are frying the ingredients. You can season if needed.

* I make the same chutney with Sambarpalli or Ajwain leaves. You can substitute Moringa with Sambarpalli leaves too.

* This chutney can be served with idli, dosa, rice and even as a sandwich spread. Tastes really delicious.

* Don’t skip cumin seeds in this chutney as it enhances the flavour so much.

* You can check the recipe for Panpolo or Neeru dose here – Panpolo/ Neeru dose

* You can check all my chutney recipes here –

Chutney recipes collection

* My most favorite chutneys –

Amma’s Tomato Chutney

Peanut Onion Chutney

Pudina Lehsun Chutney

Coriander leaves Chutney

Hotel style Tomato Chutney

Walnut Chutney

Sambarpalli or Ajwain leaves chutney

* More dishes that I make with Moringa leaves-

* Mashinga Palle Sannamudho (drumstick leaves spicy idli)

* Drumstick leaves Aloo Roti

Jowar Chocolate sponge cake |Gluten free millet cake

Click on the picture to save the recipe on Pinterest

I had always wanted to bake gluten free cakes as it had been the most requested recipe by my readers. But somehow I never got the confidence to shift from wheat flour to a millet flour completely.

Since few months, Jowar flour had become my best friend as I regularly make dosas, idlis and ladoos with it. So when I saw that people have been using it for baking too, I just could not resist trying it out.

Even the first time I tried this cake, it came out so well that I could not believe my eyes. I cut it in squares and asked my family to taste it. As they ate it, they asked for more and more and finally finished off the cake within a day. It was really that tasty. My son even gave me a million marks for it and always asks me to bake it whenever he has craving for cake.

Click on the picture to save the recipe on Pinterest

This morning the weather is so beautiful and foggy here in Qatar that I felt like baking. Baking is truly a therapy for me ❤️ and what better cake than this Jowar chocolate cake, which I had to share with all of you too. So I took the pictures and dedicated it to the beautiful weather 😍

Hope you all try and love this healthy and tasty cake too. Do let me know if any doubts and it will be a pleasure to help. Happy and healthy cooking ❤️

RECIPE:

Ingredients:

My 1 Cup = 240 ml and even though I usually measure using cups, this time I also measured using my measuring scale for those readers who want accurate measurements.

Dry Ingredients:

1 Cup Jowar flour (Sorghum flour) {106 grams}

2 Tbsp unsweetened Cocoa powder {10 grams}

1/2 tsp Baking powder

1/4 tsp Salt

Wet ingredient mix:

1/4 Cup thick Curd or Yogurt {60 ml}

1/4 tsp Baking soda

1/2 Cup Jaggery powder {66 grams}

1/2 Cup Milk {100 ml}

1/4 Cup Ghee {54 ml}

Step by step recipe:

1. Take yogurt and baking soda in a bowl. Mix well. Keep aside. Also preheat the oven in the center rack at 180 C for 10 minutes.

2. Now sieve together all the dry ingredients – Jowar flour, cocoa powder, baking powder and salt.

3. Keep the dry ingredient mix aside. Now to the yogurt- baking soda mix, add jaggery powder, milk and ghee. Mix well.

4. Now add the dry ingredient mix to the wet ingredients and mix using spatula. Don’t over mix and just fold until you can’t see any dry flour specks.

5. Now add the batter to the cake pan. I used a loaf pan of length 20 cm and width 7 cm. You can also use a square or round pan. Either grease with butter or ghee or use parchment/ baking paper. Spread the batter as evenly as possible.

6. Now add the pan to a preheated oven (read step 1) and bake at 180 C for 15 to 18 mins. In my square cake pan, it takes 15 mins as cake height is less but in my loaf pan it takes 18 mins since the cake has more height. So keep an eye after 15 mins.

Check for doneness by inserting a toothpick in the center. If comes out clear or with crumbs, cake is done. If it comes out wet, bake again for two mins or till done.

7. Allow it to cool. Once cooled, invert onto a plate.

Click on the picture to save the recipe on Pinterest

8. Cut into squares and serve. Store in a moisture free container.

Click on the picture to save the recipe on Pinterest

Notes:

* Lasts well at room temperature for a day. After that, I refrigerate since it has milk in it, it may spoil. While serving, I microwave for few seconds and it becomes soft again.

* I use Datar or Amlark brand of Jowar flour as it’s readily available in Lulu and other supermarkets here in Qatar.

* I had got many requests for measurements using scale, so I got one and measured the ingredients using the scale for this recipe. But I feel using Cup is so much easier and I recommend using Cups for just the ease of baking. Just make sure you have 1 Cup = 240 ml measuring cup set and you can use that for all my baking recipes without the need of measuring scale.

* This cake batter is a little thicker but the cake comes out very soft and spongy.

* I use both square and loaf pan for this cake and it bakes quicker in square pan at 15 mins. Loaf pan takes few minutes more as the cake height is more.

* Please remember to preheat the oven at 180 C for atleast 10 mins and don’t open over door for atleast 15 mins into the baking time. These are small but important tips while baking. If you are new to baking, I have written an article on the basics of baking. You can read it here: Baking basics for Beginners

* For more healthy cake and cookies recipes, you can check my page : Healthy cakes and cookies collection of recipes

* More recipes with Jowar flour:

Urad Jowar Dosa

Jowar Idli

Jowar Vegetable Bhakri

Instant Jowar dosa

Jowar flour ladoos

Barnyard millet Upma |Varai Upma | Easy breakfast with millets

Click on the picture to save the recipe on Pinterest

Breakfast is the most important meal in the day for me and I make sure it’s as healthy and filling as possible. Usually it’s any kind of dosa or idli but on days when the dosa batter is less, upma is my go to breakfast. Quick to make, quicker to finish, I love upma and often wonder why people make fun about it that it’s their least favorite breakfast. 🤔

Today morning, I felt peaceful as kids left for school after weekend 😀 and as I finished my morning walk, I thought of making this Barnyard millet upma. Since I was already feeling peacefully happy, I decided to utilize this moment to blog the recipe too. It has been long I am making this upma for breakfast and evening snack but never took pictures.

I have been substituting semolina or rava with millet for upma since sometime now as it’s more filling and healthy too. Also, I make pulav with millets too instead of rice for a change and love how delicious it comes out. Will share the recipe soon.

Hope you all try this simple yet tasty Barnyard millet upma. I am sure you will like it. Happy and healthy cooking ❤️

RECIPE:

Ingredients: { Serves 2 to 3 people }

1 Cup = 240 ml

{ Barnyard Millet is called Varai in Konkani, Kuthiraivali in Tamil, Sanwa in Hindi and Kavadupullu in Malayalam }

1 Cup Barnyard millet

3 Cups Water

For seasoning:

1 Tbsp Ghee

1 Tbsp Coconut Oil

2 tsp Mustard seeds

2 tsp Cumin seeds

A sprig of Curry leaves

3 Green chillies

6 to 8 Cashews

Salt to taste

Freshly grated Coconut for garnish

Step by step recipe:

1. Take 1 Cup of Barnyard millet in a bowl and wash it well. Remove water and keep aside. I use Manna brand of millet as it is readily available here in Qatar.

2. Now heat ghee and oil together in a pan. You can use only oil too but ghee adds a wonderful flavour to the upma. Add mustard seeds and cumin seeds. Once mustard starts spluttering, add curry leaves, green chillies and cashews. Fry till cashews turn light brown in colour.

3. Now add the washed millet and roast for few seconds. Now add salt and mix well.

4. Add hot water and mix together with the ladle.

5. Lower the flame to medium, cover and cook till the water gets absorbed completely by the millet and the mixture turns dry (takes about 10 mins) . Check if millet is cooked by mashing between fingers. Garnish with freshly grated Coconut. Serve hot.

Serve Barnyard millet Upma as it is or with peas curry like I have served and with chutney powder. Coconut chutney also goes well with this upma.

Click on the picture to save the recipe on Pinterest

Notes:

* I have used Manna brand of Barnyard millet as it is readily available here in Qatar in all major supermarkets. I get mine from Lulu or Grand mall.

* 1 Cup Barnyard millet needs atleast 3 Cups of water to cook. Keep hot water ready beforehand and add as soon as you roast the millet in the seasoning.

* Making upma with millet takes more time than regular upma with semolina or sooji as millet takes atleast 10 mins to cook but it is more filling and healthier.

* You can also add vegetables to make it vegetable upma.

* I also make Barnyard millet idli and it tastes delicious.

* You can check all my Millet recipes here:

Millet recipes Collection

Instant Oats Appo / Oats Vegetable Paniyaram / Gluten free recipe

Click on the picture to save the recipe on Pinterest

If there is one ingredient that is always available at my house, it’s Oats. My son loves Oats Vegetable Bhakri and my daughter loves Instant Oats Idli. Both these dishes can be quickly made within 30 mins and is a great help when kids demand for food ( When Ammaaa, hungryyy calls come unexpectedly 😁).

Similar is this Oats appo which I make regularly for my son when he comes back from school. Though I have shared all the recipes that I make with oats on my Oats recipes Collection page, this one recipe was long pending. So today when I made it, I thought of sharing it here too.

This is one delicious appo with bites of onion, capsicum, green chillies and carrot, crispy on the outside and soft inside. Do try it for breakfast or evening snack. If you don’t have appe pan, you can make small dosas with this batter too, like little bhakris. Comes out delicious as well. You will surely love it. Happy and healthy cooking ❤️

RECIPE:

Ingredients: { Makes around 21 small appos }

1 Cup = 240 ml

1 Cup Instant Oats ( I use saffola or quaker brand )

1 Tbsp Rice flour

1/2 Cup Curd or Yogurt

Approx 1/2 Cup Water

1/4 Cup finely chopped Onion

1/4 Cup finely chopped Capsicum

1/4 Cup finely grated Carrot

3 finely chopped Green chillies or to taste

2 Tbsp finely chopped Coriander leaves

1/4 tsp Turmeric powder

Salt to taste

Oil or Ghee to cook the appos

Step by step recipe:

1. Take instant oats, rice flour, turmeric powder and salt in a bowl. Add yogurt.

2. Add water, little by little to make a thick batter. For 1 Cup Oats, it takes 1/2 Cup Curd and 1/2 Cup Water for me. But will change according to the brand of oats and the consistency of Curd. Just make a thick batter and not thin one.

3. Now add finely chopped onion, capsicum, carrot, green chillies and coriander leaves.

4. Mix well. Batter is ready to make appos instantly.

5. Heat the appo pan or Paniyaram pan and when hot, reduce the flame to medium. Now add ghee or oil on the holes of the pan. Now add a spoonful of batter into each of the holes. Don’t overfill the holes.

6. Now cover and cook on medium to low flame till the surface cooks. Now add little ghee or oil and flip over the appos carefully. Cook again till the inside cooks well and underside turns crisp.

7. Remove and serve with a chutney of your choice.

Notes:

* I serve with Coconut chutney or Hing chutney. Here I have served with Hing chutney. Just grind together 1 Cup Coconut with 3 Red chillies, A pinch of Hing, 1 tsp Tamarind paste, salt and water to smooth paste.

Click on the picture to save the recipe on Pinterest

* Two important points with these appos are:

1. Don’t make a thin batter. It should be thick.

2. While making appos, make sure to add only less batter in each hole and cook on medium to low flame so that the appos cook till the inside. Also when you flip, tap slightly so that the under surface gets crisp.

* Use a skewer or the backside of a small spoon to check if the appos are done from inside. If it comes out wet, cook again on low flame. Once done, the skewer will come out dry.

* If you don’t have appe pan, you can make small dosas with this batter too, like little bhakris. Comes out delicious as well.

* As we are not adding any gluten in the form or Rava or semolina, nor are we adding baking soda, these appos won’t be extra big or fluffy but they are still soft inside and crispy outside. Tastes really delicious due to veggies inside it.

* More Appo recipes that you can try:

Mixed Dal Appo/ Paniyaram

Godu Appo / Instant Wheat flour Banana Paniyaram

* I regularly make different kinds of dishes using Oats like Dosa, Idli, Bhakri, Paratha and Cake. You can check them in my Oats recipe compilation page.

Oats recipes Collection

Dudde Upkari | Konkani style Pumpkin stir fry

Click on the picture to save the recipe on Pinterest

I have been sharing many Konkani recipes on the blog which have been loved by all of you. So nowadays when I cook something from our amchi cuisine which is loved a lot by us, I immediately take pictures to share on the blog, even if it’s a very simple dish like this Pumpkin upkari.

Mostly all our upkaris or stir fries are very simple with mustard seeds, curry leaves, green chillies or red chillies in seasoning with hing or garlic or onion seasoning. This particular stir fry is my most favorite with jaggery added that enhances the taste a lot. The simplicity is what makes it extra special and I can eat it as it is, even without rice. 😍

We are getting locally grown pumpkin in Qatar and it’s flavour and texture is amazing. Very quick to cook and super tasty. So I have been making this upkari almost every week. Also it’s one of the healthiest vegetable too. Hope you all try and love this delicious upkari. Happy and healthy cooking ❤️

RECIPE:

Ingredients: 1 Cup = 240 ml

1 medium sized Pumpkin ( about 4 cups chopped)

3 Green chillies

1 to 2 Tbsp Jaggery or to taste

For seasoning:

2 Tbsp Coconut Oil

1 tsp Mustard seeds

A sprig of Curry leaves

A pinch of Hing/ Asafoetida

Salt to taste

Freshly grated Coconut for garnish

Step by step recipe:

1. Wash well, remove the core, peel the skin of the pumpkin. Chop into bite sized cubes as shown in the picture.

2. Heat oil in a pan, add mustard seeds, hing, curry leaves and green chillies. Let mustard seeds splutter.

3. Now add the chopped pumpkin pieces along with salt. Mix well.

Cover and cook on medium flame. Don’t add much water while cooking as pumpkin releases its own water as it cooks. If needed, that is if you feel it’s sticking in the bottom of the pan, add just a spoonful of water.

4. Pumpkin cooks very quickly and within 5 mins, you will see that it has turned soft. Now add jaggery.

5. Mix well. Cover and cook on low flame for 5 more mins or till the pumpkin pieces turn very soft. Now garnish with freshly grated coconut. Check for salt/ jaggery. Done. 🙂

6. Enjoy dudde upkari with pej (matta rice gruel) and Kosambari or with rice and rasam.

Click on the picture to save the recipe on Pinterest

Notes:

* You can use any variety of Pumpkin for this upkari. I use the local one available in Qatar.

* Some people don’t peel the pumpkin but I love it when peeled.

* Hing and jaggery are very important to give flavour to the upkari. So please don’t forget it. You can add jaggery, less or more, as per your taste.

* Don’t add much water while cooking this upkari as pumpkin releases its own water. Just add a spoon in the beginning if you feel pumpkin is sticking to the pan. Once you cook it covered on medium flame, it will start turning soft and release water.

* More recipes with Pumpkin:

Instant Pumpkin Idlis (Dudde kadamb)

Orange flavoured Pumpkin soup (Narangi Shorba)

* You can check all my Konkani recipes here:

Konkani recipes collection

Join me in my journey with a foodie husband and hungry kiddos while I make them eat healthy!